 enables
comprehensive design of the area around the building. Thanks to it, user can
insert large objects into architectural designs, such as gazebos, canopies,
garden houses, garden greenhouses and pergolas. This command also contains
 External architecture
command  enables
comprehensive design of the area around the building. Thanks to it, user can
insert large objects into architectural designs, such as gazebos, canopies,
garden houses, garden greenhouses and pergolas. This command also contains
a rich database of small architectural elements, playgrounds,
garden furniture and external lighting. This command also includes such
equipment objects as: flowerpots, grills and fireplaces, garden saunas and
jacuzzis, swimming pools, ponds, or various types of waste containers. It is
also possible to insert greenery elements. Most of the objects mentioned above
are parametric objects, for which user can specify any dimensions. The dialog
box contains fields for specifying dimensions. It is also possible to indicate
dimensions on the drawing after clicking the Indicate on
the drawing  button.

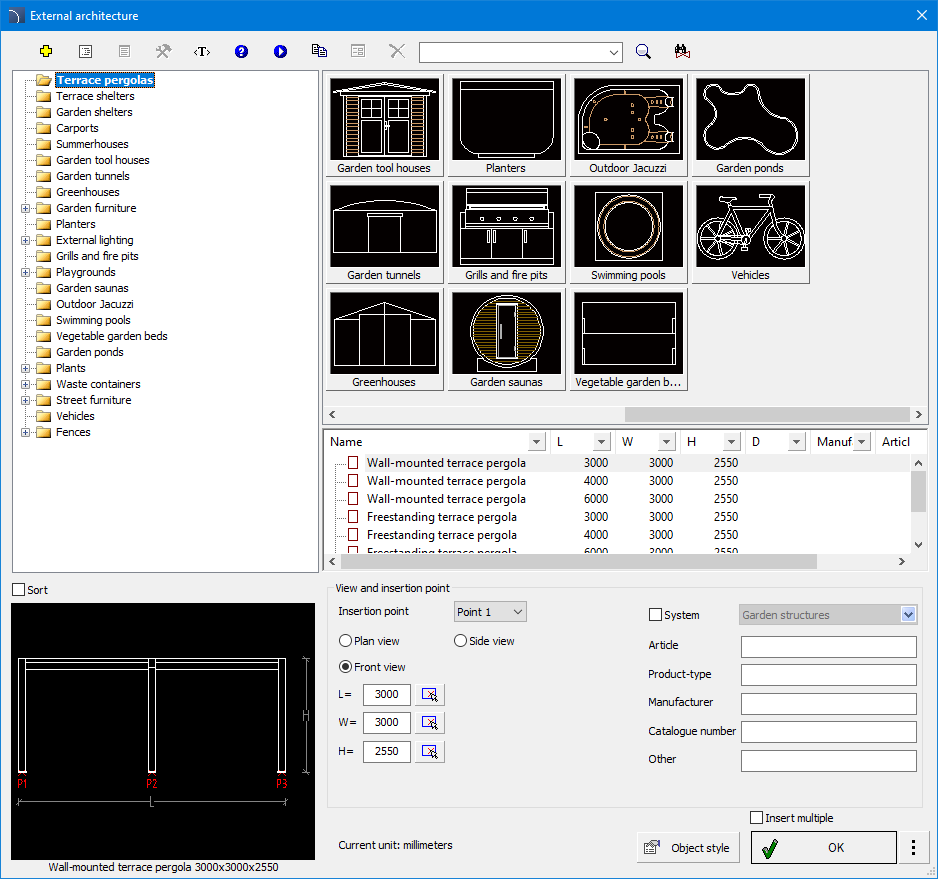
 External architecture dialog
box contains:
The top tools menu that contain the following active buttons:
 Define new -
ads a new element to the database. The method of extending the database is
described in the Defining User Blocks chapter.
 Technical
data - information about the parameters of the selected object.
 Translate
command - opens a glossary of terms used in the command dialog and allows
user to add his own translations.
 Help -
contains a link to the online support file.
 Video -
contains a link to an instructional video on CADprofi website.
 Copy to "User"
category - allows user to copy and edit the item type.
 Edit - allows
user to edit an item from the "User" directory.
 Delete -
allows user to delete an item from the "User"
directory.
In addition to the above functions, this command also includes options for searching the entire database of lightning protection system elements or in a selected branch.
Context menu - contains options available for the selected item after clicking the right mouse button. Commands from the context menu are analogous to commands from the toolbar.
The command dialog box contains the following fields:
Category Tree - a collection of all categories and items contained in the library, presented in an expandable tree layout. User can adjust the order in which items are displayed in the list by using the Sort option.
Thumbnail view - displays the contents of the currently selected category as thumbnails.
Detailed list - contains a detailed list of available items.
Preview - a window that displays a large preview of the selected item. Right-clicking on the preview will enlarge the view.
View and insertion point - contains view options and editing of object dimensions. Allows user to enter additional information about the object.
Object style - allows user to change display options.
Next to the OK button there is a radio button in the form of a drop-down list that contain the available insertion options:
 Editing - the object is equivalent to rebuilding the
block, it is not a change of scale in the X and Y directions. Thanks to this,
the correct appearance of the object is always obtained, and detailed elements
(e.g. handles, holes, etc.) are not distorted. It is possible to quickly edit an
object by double-clicking the left mouse button.

6 Procedures
Inserting external architectural elements
1.
Run the External architecture command
 .
.
2. In the dialog box, select a category from the available list.
3. Click the thumbnail of the object you want to insert into the drawing. A preview of the selected object will appear in the lower part of the window.
4.
(Optional) Specify the dimensions of the object. Dimensions can be retrieved
from the drawing by clicking the  icon.
icon.
Specify the insertion parameters: Insertion point, View and dimensions L , W , H.
5. (Optional) Fill in the object identification data (Article, Product-type, Manufacturer, Catalog Number, etc. ).
6. Press the OK button. (Optional) Specify the arrangement method.
7. Specify the insertion point.